Revamp your Git workflow with the magic of Git Rebasing.
👋 Hey there! I'm Shivam, a self-taught web developer from India. My passion lies in web development, and I thrive on contributing to open-source projects and writing technical blogs. 🚀
Teamwork fuels my creativity, and I take pride in building efficient, user-friendly solutions. Let's code together! 💻🌟
Have you ever found yourself lost in a sea of branching and merging while working on a project in Git? Do you dread the thought of trying to merge changes from a long-lived branch into your own? Fear not, for there is a solution to streamline your Git workflow: Git Rebasing.
This powerful tool can help you keep your commit history clean and organized and make conflict resolution a breeze. In this article, we'll dive into the magic of Git Rebasing and show you how to revamp your workflow for a smoother, more efficient programming experience.
Introduction
Git is a distributed version control system that allows developers to track changes to their code over time. Git is widely used in the software development industry and has become an essential tool for programmers.
Git rebasing is a powerful feature that allows developers to streamline their workflow by modifying the commit history of a branch. Rebasing is an alternative to merging, which can clutter the commit history and make it difficult to track changes over time.
What is Git Rebasing?
Git rebasing is a process that allows you to reapply changes from one branch to another. It works by taking the changes made in one branch and applying them to another branch as if they were always there.
Let's visualize this example scenario with a diagram. In the diagram below, we have a simplified representation of the commit history for our project:
             o --- o --- o --- o --- o (master)
            /
o --- o --- o --- o --- o --- o --- o (feature-A)
We can see that the master branch has five commits, while the feature-A branch has seven commits. Now, let's say that another team member has made changes to the "master" branch and we need to incorporate those changes into our feature-A branch.
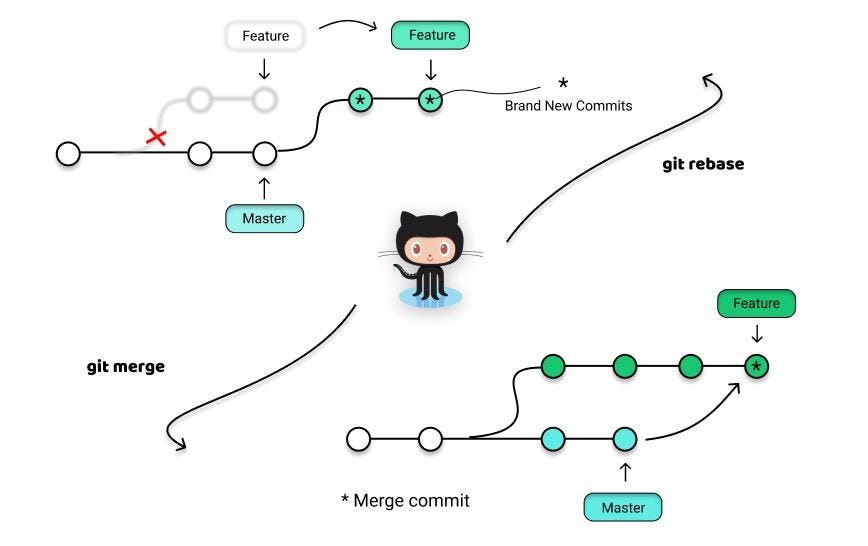
One way to do this is to use Git merging:
             o --- o --- o --- o --- o --- o (feature-A)
            /                             /
o --- o --- o --- o --- o --- o --- o --- o (master)
As we can see, Git creates a new commit that combines the changes from both branches. However, this creates a non-linear commit history, which can make it difficult to understand the evolution of our codebase.
Alternatively, we can use Git rebasing to integrate the changes directly into the feature-A branch:
             o --- o --- o --- o --- o --- o --- 'o' --- 'o' --- 'o' (feature-A)
            /
o --- o --- o --- o --- o --- o --- o --- o (master)
In this case, Git applies the changes from the master branch directly onto the feature-A branch, creating a cleaner and more linear commit history. We can see that the feature-A branch now has three new commits (o', o', and o') that incorporate the changes from the master branch.
This example shows how Git rebasing can help us to maintain a cleaner and more understandable commit history.
When to Use Git Rebasing?
Git rebasing is beneficial in a variety of situations, including working with long-lived branches and working with a team. When working on large projects with multiple contributors, rebasing can help keep the commit history clean and easy to understand.
One of the benefits of using Git rebasing is that it makes it easier to resolve conflicts. When you rebase a branch, Git tries to apply the changes from the rebased branch to the target branch in a linear fashion. If there are conflicts, Git will pause the rebasing process and allow you to resolve the conflicts manually.
This can be more straightforward than merging, which can create merge conflicts that are difficult to resolve.
- To better understand the benefits of Git rebasing, let's take an example.
Suppose you and your team are working on a project and have been working on separate branches. You have been working on a feature branch for a while, and during this time, the main branch has been updated several times. Now, you want to merge your changes from the feature branch to the main branch.
Here's where Git rebasing can come in handy. Instead of merging your changes, you can rebase your feature branch onto the main branch. This will create a linear commit history, which is easier to understand and follow.
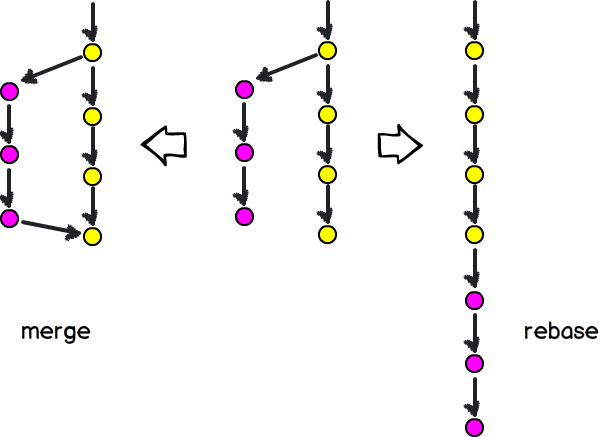
The following diagram illustrates the difference between merging and rebasing:
Merging:

                A---B---C---D---E  main
               /                 \
    F---G---H---I---J---K---L---M  feature

Rebasing:

                A---B---C---D---E---I'---J'---K'---L'---M'  main
                                             /
                              F---G---H---------                 feature
As you can see, the rebased commit history is much cleaner and easier to follow. It also eliminates any unnecessary merge commits, making it easier to track down bugs or issues.
Moreover, it can be beneficial when working on a long-lived branch, such as a release branch. When you rebase your feature branch onto the release branch, you can ensure that your changes are up-to-date with the latest changes in the release branch. This can help prevent any conflicts or issues down the road.
In addition, it is worth noting that Git rebasing should be used with caution, especially if you are working on a public repository or with other collaborators. Rewriting the commit history can create confusion and make it difficult for others to understand what changes were made and why. As a best practice, always communicate with your team before rebasing and ensure that everyone is on the same page.
How to Use Git Rebasing?
Let's dive into the process of performing Git rebasing step-by-step.
Step 1: Update the Local Repository
Make sure your local repository is up to date with the remote repository by running the following command:
git fetch
git pull
This will ensure that you have the latest changes from the remote repository.
Step 2: Checkout Target Branch
Checkout the branch that you want to rebase onto by running the following command:
git checkout target_branch
This will switch your working branch to target_branch, which will be the new base for your changes.
Step 3: Initiate Git Rebase
Now, run the following command to initiate the Git rebase process, where source_branch is the branch that contains the changes that you want to apply to the target_branch:
git rebase source_branch
This command will apply the changes made in the source_branch onto the target_branch.
For example, let's say that you have the following commit history:
      Original                        Updated
         |                                |
         A                                A
        /                                / \
       B    <- Branch A                B   C
      /                                /
     C    <- Branch B                D
Here, Branch A is the target_branch and Branch B is the source_branch. The git rebase source_branch command will apply the changes made in Branch B (commit C) onto Branch A, resulting in a new commit D. The commit history will now look like this:
         A'                               A'
        /                                / \
       B                                B   C
      /                                /
     C                                D
Step 4: Resolve Conflicts
During the rebasing process, conflicts may arise, which can be resolved manually. You can identify the conflicts by running:
git status
This will show the conflicting files. Resolve any conflicts that arise during the rebasing process by opening the conflicting file in your code editor and editing the file to resolve the conflicts. After resolving the conflicts, mark them as resolved by running:
git add conflicting_file

// conflicting_file is a filename
Step 5: Continue Rebase
Once the conflicts are resolved, continue the rebasing process by running the following command:
git rebase --continue
This will apply the remaining changes and create a new commit for each change.
Step 6: Push Changes
Finally, push your changes to the remote repository by running:
git push
This will update the remote repository with the new commit history.
By following these steps, you can successfully rebase a branch, apply changes from one branch to another, and maintain your commit history clean and clear.
Common Mistakes and How to Avoid Them
Mistakes are common when it comes to Git rebasing, but they can be easily avoided with a bit of caution and communication. Here are some common mistakes to watch out for:

🚫👥🙅♂️ Not understanding the potential consequences of the process: Rewriting the commit history can make it difficult to understand how the project evolved. To prevent misunderstanding, utilize rebasing only in suitable instances and communicate your actions to your team.
Example: Let's say you are working on a project with a team and decide to rebase your branch onto the master branch without communicating with your team.

However, unbeknownst to you, one of your team members had made changes to the master branch while you were working on your branch. When you rebase, their changes will be overwritten, potentially causing conflicts and errors down the line. To avoid this, communicate with your team before rebasing to ensure that everyone is on the same page.
🤝🔎👀 Not resolving conflicts properly: Carefully reviewing and resolving conflicts is crucial to ensure the integrity of the codebase. If conflicts are not resolved correctly, it can lead to errors in the code and potentially cause bigger issues down the line.
Diagram: When rebasing, it's possible to encounter conflicts where changes made in one branch conflict with changes made in another branch. In these cases, it's important to carefully review the conflicting changes and resolve them properly.
       Original                        Updated
         |                                |
         A                                A
        /                                / \
       B    <- Branch A                B   C
      /                                /
     C    <- Branch B                D
In the example above, both Branch A and Branch B have changes to the same file. When Branch A is rebased onto Branch B, there is a conflict as both branches have changes to the same file. It's important to carefully review the changes and resolve the conflict properly to ensure that the final result is correct.
🤝💬👥 Not communicating with your team: Beginners may not realize that rebasing can potentially overwrite changes made by other team members. To avoid overwriting important changes, it's a good idea to only rebase branches that are under your control or communicate with the relevant team members before rebasing.
Diagram: When multiple team members are working on the same project, it's important to communicate before rebasing to avoid overwriting each other's changes.
          Master Branch
                  |
                  A    <- Team member 1's branch
                 / \
         B     C   D  <- Team member 2's branch
        /       \
  E   F         G    <- Your branch
   \ /           |
    H            H'   <- Result after rebasing your branch onto the master branch
In the example above, multiple team members are working on different branches. When you rebase your branch onto the master branch, you may overwrite changes made by other team members if you're not careful. To avoid this, communicate with your team members before rebasing to ensure that everyone is aware of the changes being made.
To avoid these mistakes and ensure the success of Git rebasing, remember to:
🚫👥🙅♂️ avoid confusion
🤝🔎👀 review and resolve conflicts properly
🤝💬👥 communicate with your team
Using Git rebasing can be a powerful tool to streamline your workflow, but it's necessary to use it properly and communicate with your team to avoid potential issues.
Conclusion
In conclusion, Git rebasing can be a powerful tool for keeping your commit history clean and making collaboration on projects smoother. However, it's necessary to use it wisely and communicate with your team to avoid common mistakes like overwriting changes or creating confusion in the commit history.
I hope this blog has given you a better understanding of Git rebasing and how to use it effectively. If you enjoyed reading this, be sure to follow ReactPlay blogs for more informative content. Don't forget to give it a thumbs up and share it with your friends. You can also follow me on my socials for more updates. Happy coding!