Mastering TypeScript: A Comprehensive Guide for Getting Started with TypeScript

👋 Hey there! I'm Shivam, a self-taught web developer from India. My passion lies in web development, and I thrive on contributing to open-source projects and writing technical blogs. 🚀
Teamwork fuels my creativity, and I take pride in building efficient, user-friendly solutions. Let's code together! 💻🌟
TypeScript is a strongly typed superset of JavaScript that adds optional static typing, classes, and interfaces to the language. TypeScript can help you catch errors before runtime and provide better editor support for your code. This tutorial is your ultimate guide to mastering the basics of TypeScript and getting started with it like a pro.

Setting Up TypeScript
Before we can start writing TypeScript code, we need to set up our development environment. Here are the steps to set up TypeScript:
1. Install TypeScript
The first step is to install TypeScript globally using npm. Open your terminal or command prompt and run the following command:
npm install -g typescript
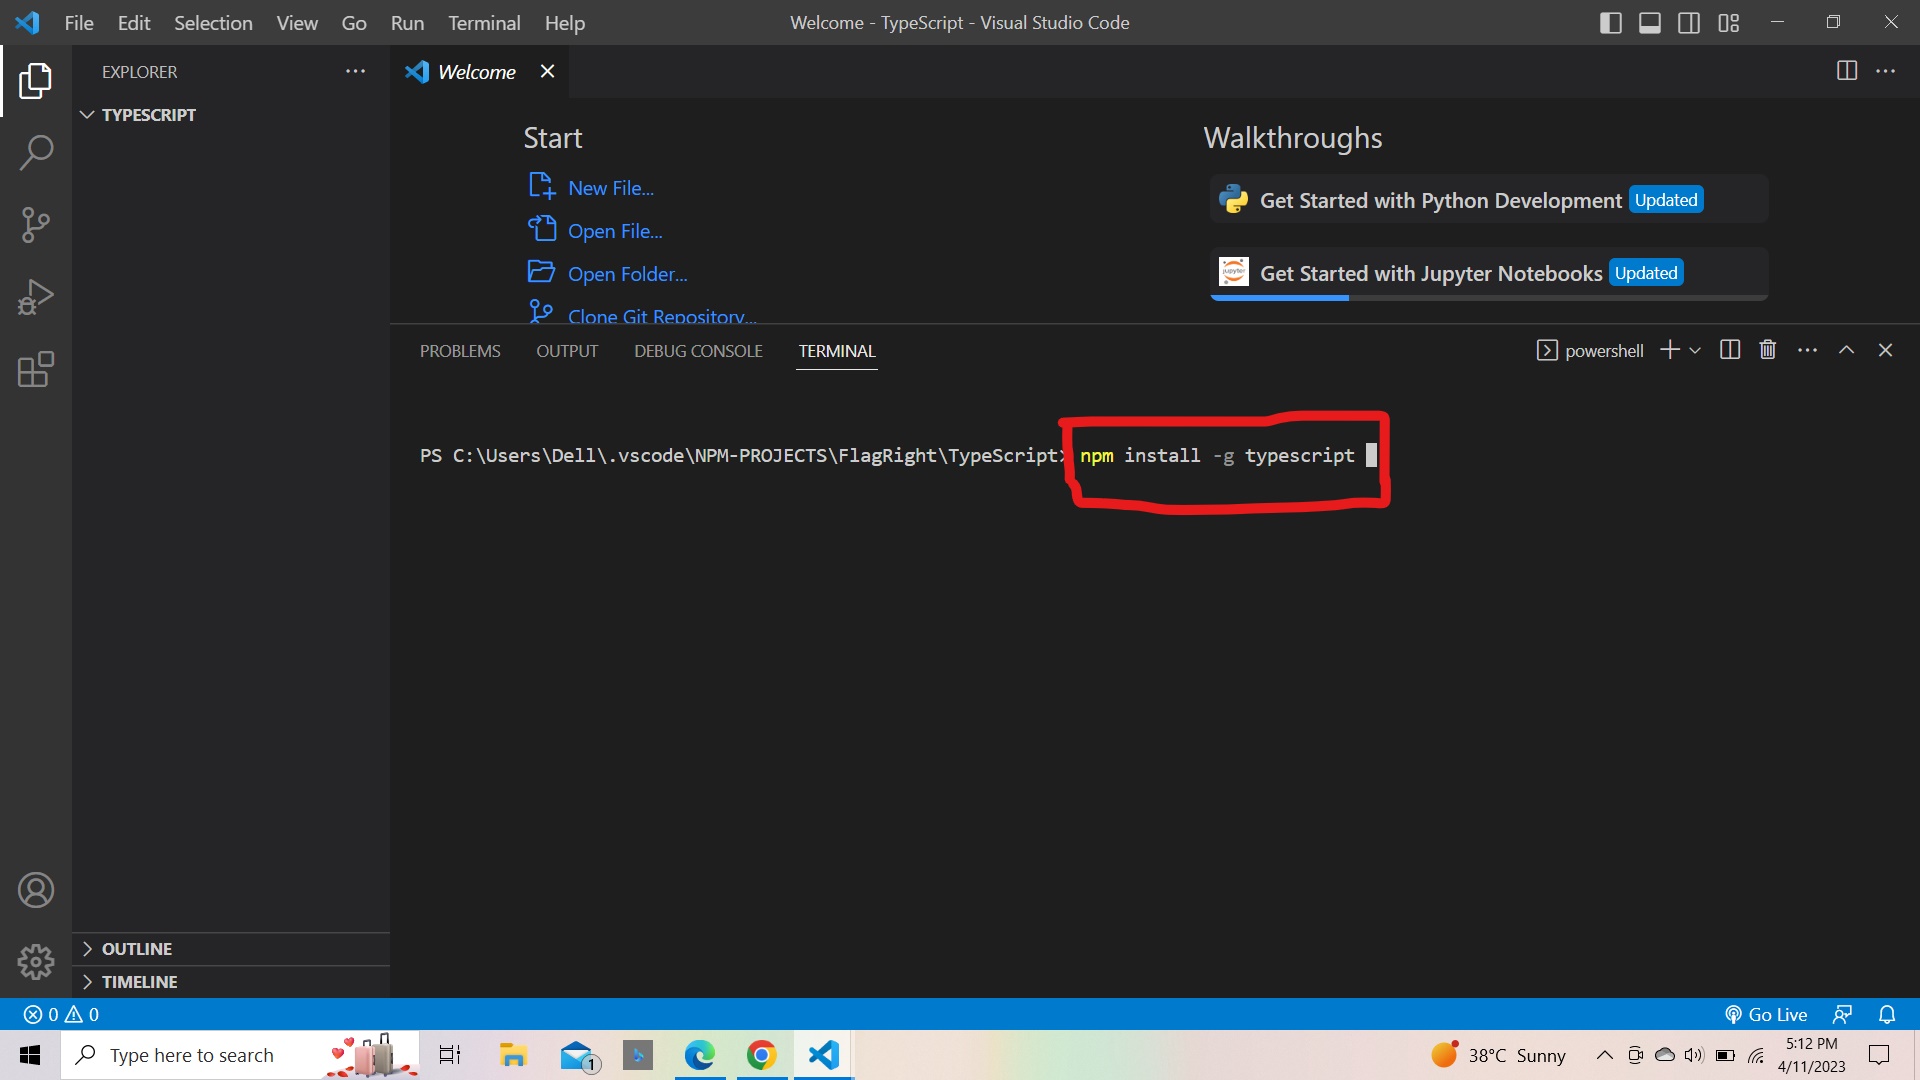
This will install the latest version of TypeScript on your system. The -g option installs TypeScript globally, so you can use it from any directory.
2. Create a new TypeScript file
Next, create a new file with an .ts extension. This will be our TypeScript source file. You can name the file anything you like, but for this example, we will call it index.ts.
Open your text editor and create a new file called index.ts. Add the following line of code:
console.log('Hello, TypeScript!');
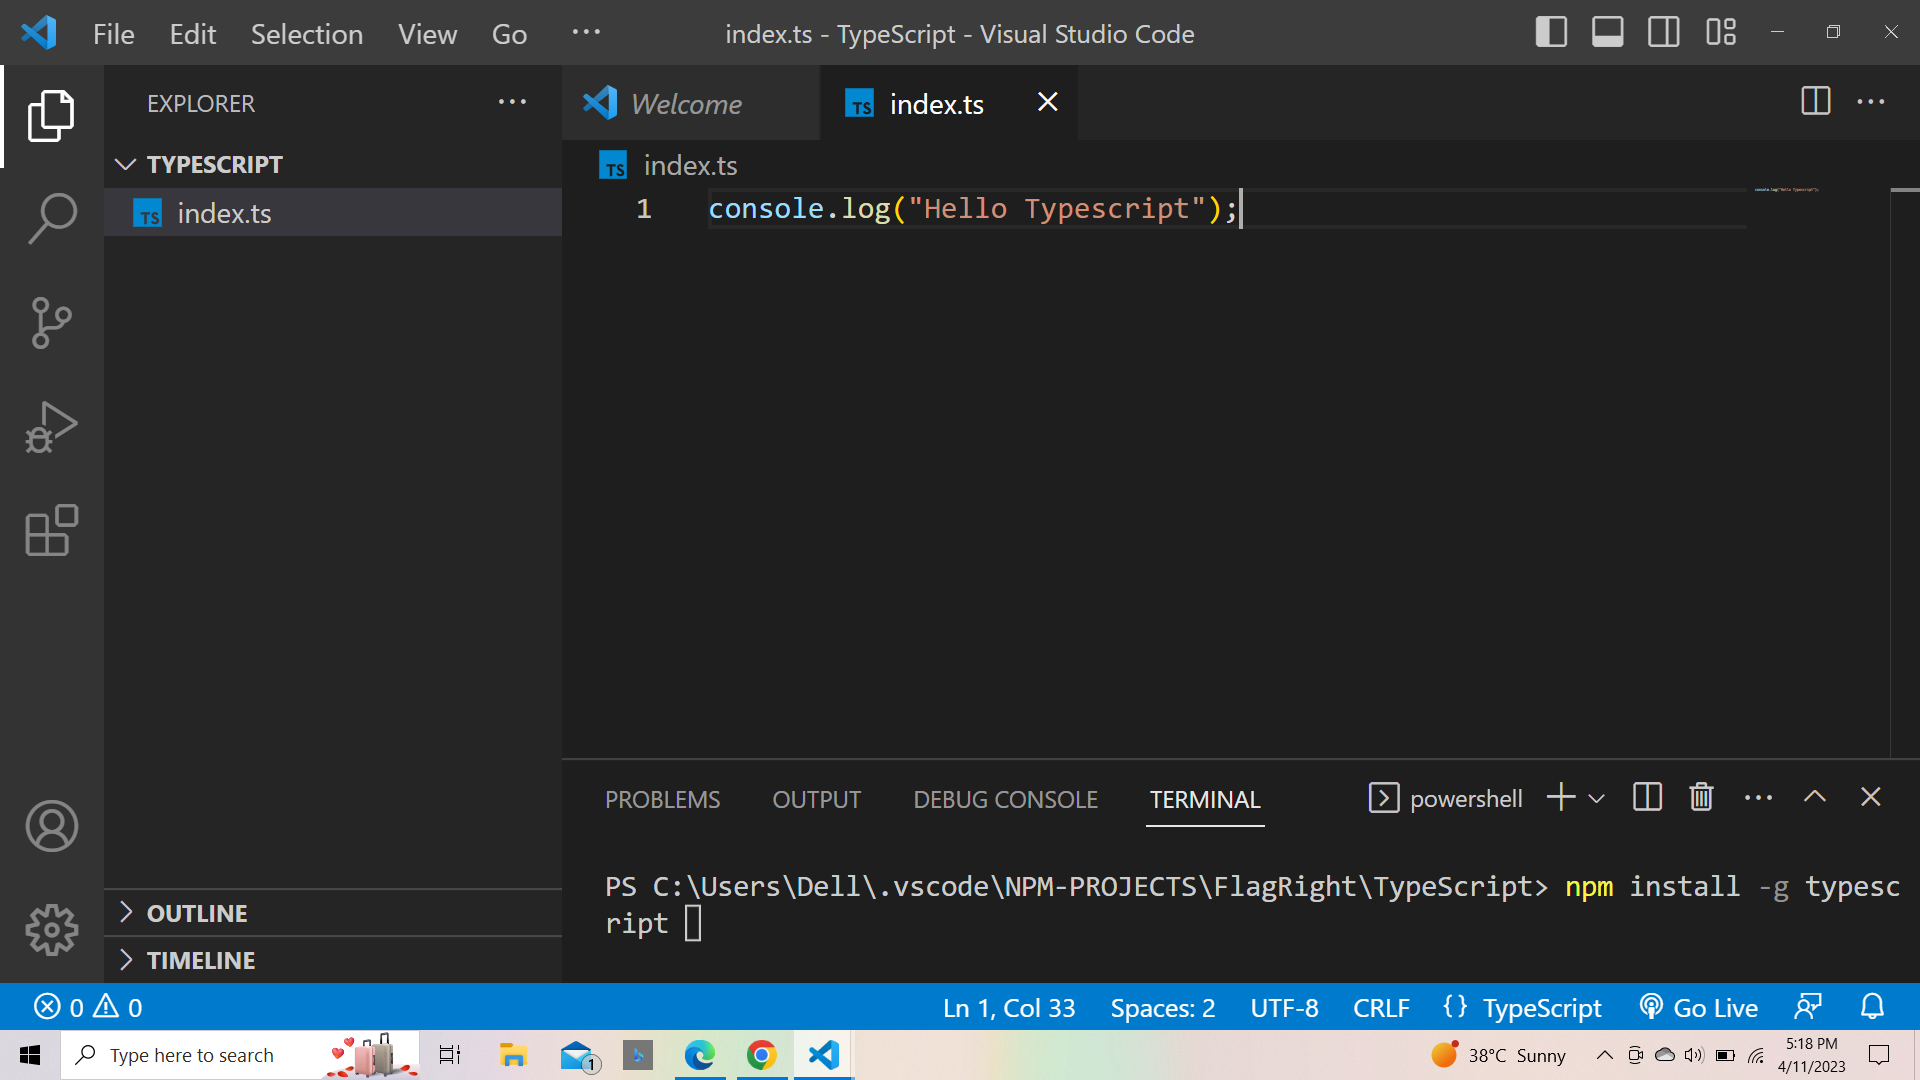
This is a simple TypeScript program that prints a message to the console.
3. Compile the TypeScript file
Now that we have our TypeScript source file, we need to compile it to JavaScript. To do this, we will use the TypeScript compiler tsc.
Open your terminal or command prompt and navigate to the directory where your index.ts file is located. Then, run the following command:
tsc index.ts
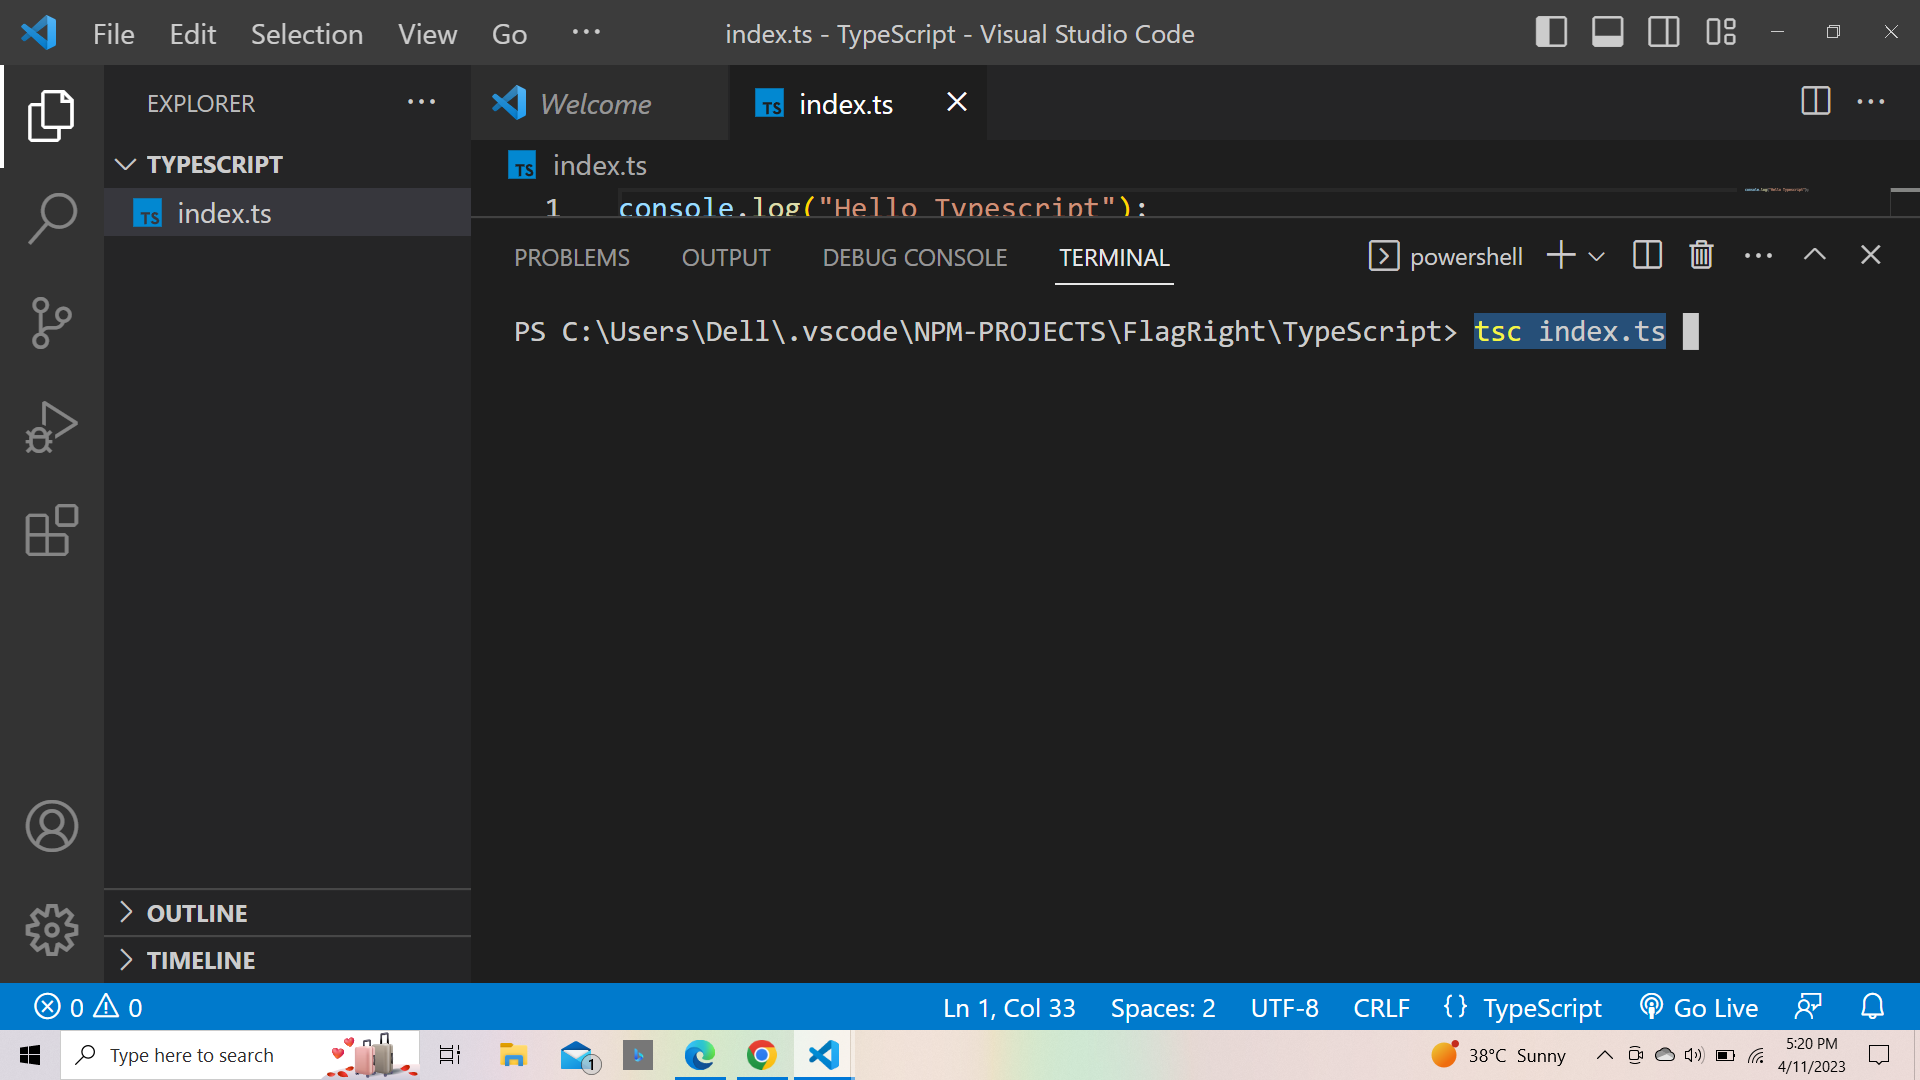
This will compile the TypeScript file to JavaScript. The output will be a new file called index.js in the same directory as your TypeScript file.
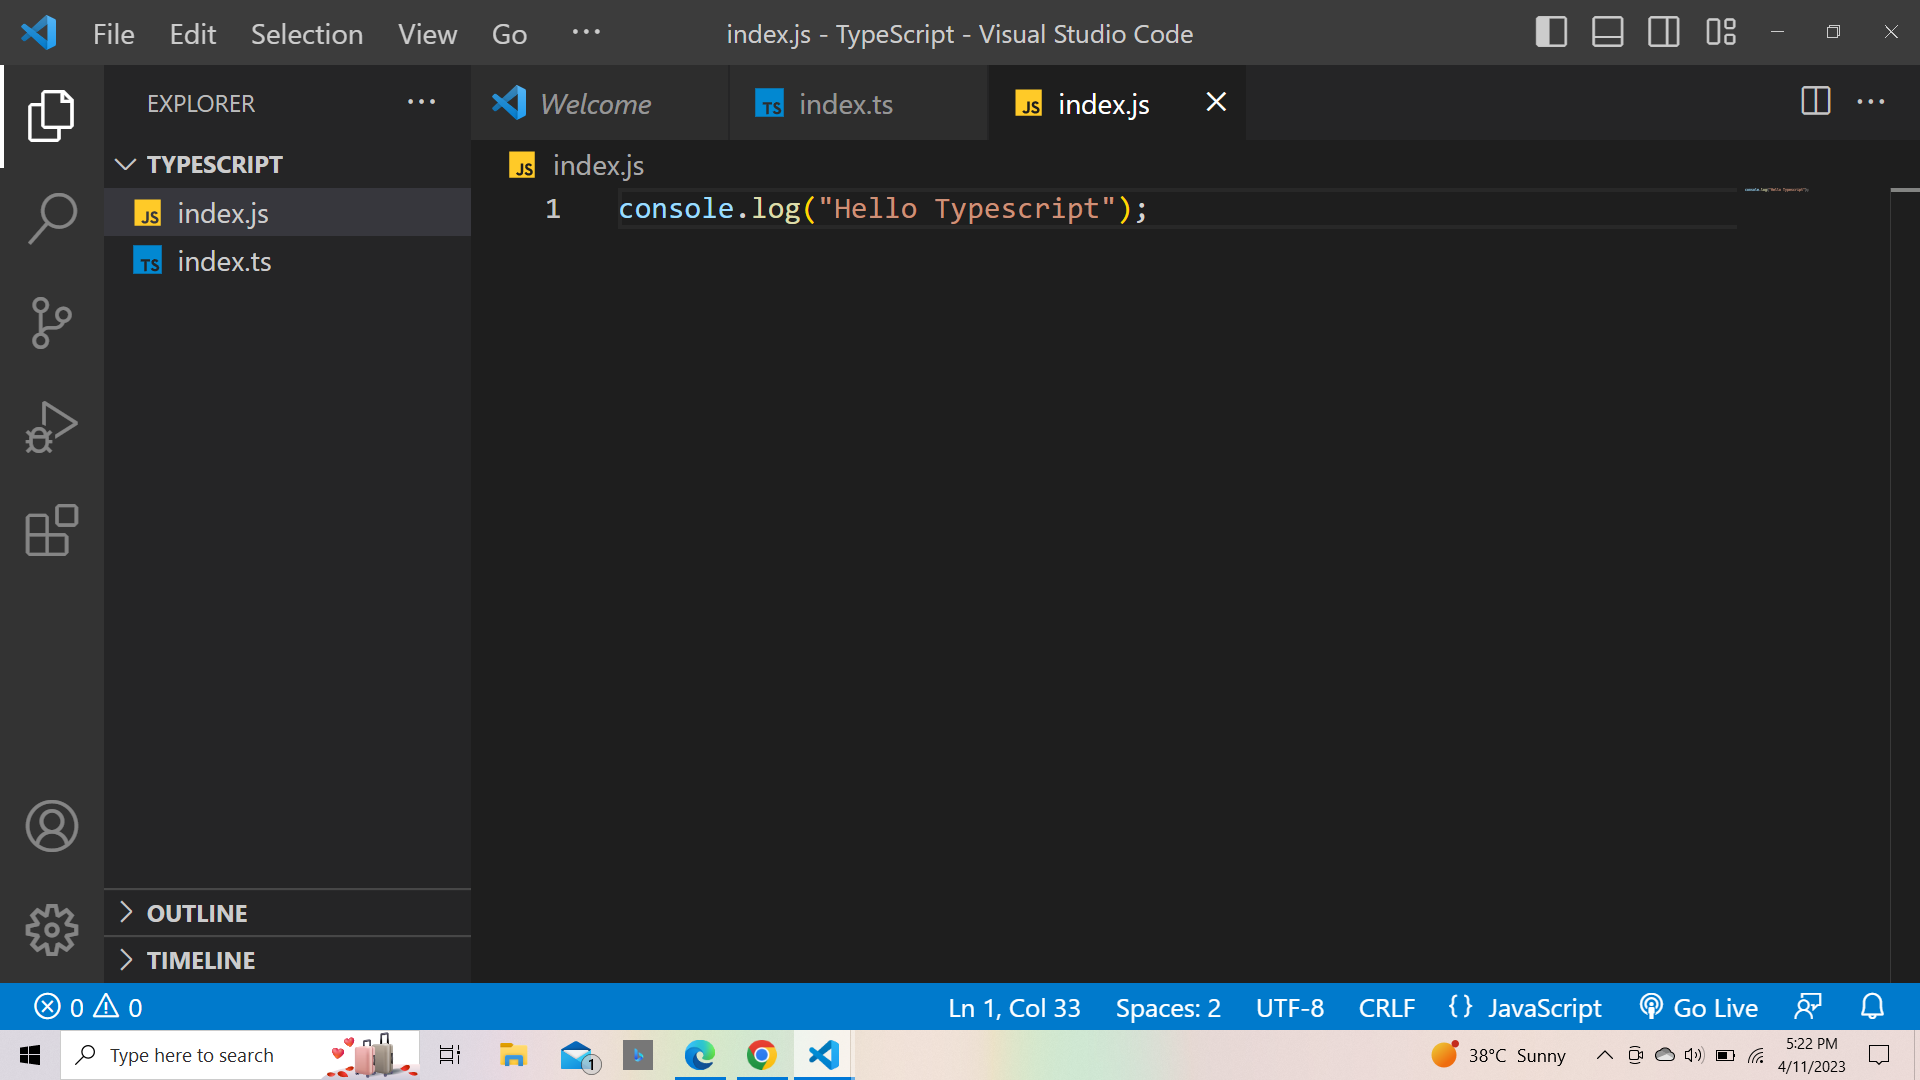
4. Run the JavaScript file
Now that we have our JavaScript file, we can run it (if we want) using Node.js. Open your terminal or command prompt and run the following command:
node index.js
This will run the JavaScript file. You should see the message "Hello, TypeScript!" printed on the console.
Congratulations! You have set up TypeScript and compiled your first TypeScript program into JavaScript. You can start writing more complex programs using TypeScript's advanced features such as type annotations, classes, and interfaces.
Basic TypeScript Concepts
TypeScript is a statically typed language, which means we can define types for variables, functions, and other constructs. Let's start by discussing variables and data types.
Variables and Data Types
In TypeScript, we can declare variables using the let or const keyword. We can also specify the type of a variable using the :Type syntax. For example, we can declare a variable count of type number like this:
// Variable with a specific type
let count: number = 5;
If you don't specify a type, TypeScript will infer it based on the value assigned to the variable:
// Variable with inferred type
let message = 'Hello, TypeScript!';
TypeScript supports the following data types:
numberfor numeric valuesstringfor text valuesbooleanfor true/false valuesanyfor the value that can be of any type
Functions and Interfaces
Functions in TypeScript can have types for their parameters and return values. For example, we can define a function addNumbers that takes two number parameters and returns a number:
function addNumbers(a: number, b: number): number {  //here `number` is the type of `a` and `b`. It means, we can also assign numbers to them, if we will try to give any other values like string or boolean, then it will going to give us error.
  return a + b;
}
Interfaces in TypeScript define the shape of an object. For example, we can define an interface Person that has a name property of type string and an age property of type number:
interface Person {
  name: string;
  age: number;
}
We can then create an object of the type Person like this:
let person: Person = {
  name: 'John',
  age: 30
};
Classes and Objects
TypeScript also supports classes and objects. We can define a class Greeter that has a greeting property and a greet method:
class Greeter {
  greeting: string;

  constructor(message: string) {
    this.greeting = message;
  }

  greet() {  //this is greet method/function
    console.log(`Hello, ${this.greeting}!`);
  }
}
We can then create an object of the type Greeter and call its greet method:
let greeter = new Greeter('TypeScript');
greeter.greet(); // Hello, TypeScript!
Modules and Namespaces
TypeScript has built-in support for modules and namespaces. Modules allow you to organize your code into reusable, shareable units. For example, we can define a Greeter class in a separate file greeter.ts and then import it into our main file app.ts like this:
// greeter.ts <- FileName
export class Greeter {
  // ...
}

// app.ts <- FileName
import { Greeter } from './greeter';

let greeter = new Greeter('TypeScript');
greeter.greet();
Namespaces allow you to group related code. For example, we can define a namespace MyNamespace that has a message property.
namespace MyNamespace {
  export const message = 'Hello, TypeScript!';
}

console.log(MyNamespace.message);
Advanced TypeScript Concepts
Generics and Type Inference
Generics are a valuable TypeScript feature that allows you to write reusable code that works with a variety of types. In TypeScript, you can define a function or a class with a generic type parameter, which can be used to represent any type.
For example, consider the following identity function that returns its argument:
function identity<T>(arg: T): T {
  return arg;
}

let result = identity<string>('Hello, TypeScript!');
Here, T is a type parameter that represents any type. The function identity takes an argument of type T and returns a value of the same type. In the example above, we're using the function identity with the type parameter string to return the string "Hello, TypeScript!".
Type inference in TypeScript allows the compiler to infer types depending on the context. For example, if we don't specify the type parameter of the identity function, TypeScript will infer it based on the type of the argument:
let result = identity('Hello, TypeScript!'); //if we'll use booleans here, then, TS will think the result is a boolean value.
Here, TypeScript infers that the type parameter T is string based on the argument "Hello, TypeScript!".
Decorators and Mixins
- Decorators
In simple terms, a decorator is a way to add extra functionality to a class, function, property, or method in TypeScript. They are a special kind of declaration that can be attached to a class declaration, method, accessor, property, or parameter. Decorators are similar to annotations in other programming languages and are used to modify the behavior of a class or its members at runtime.
Let's consider an example. Imagine you have a class called Logger that logs information about a class's method calls. With decorators, you can attach this Logger class to any method in your codebase. Here's how it works:
function log(target: any, key: string, descriptor: PropertyDescriptor) {
  const originalMethod = descriptor.value;

  descriptor.value = function(...args: any[]) {
    console.log(`Calling ${key} with`, args);
    const result = originalMethod.apply(this, args);
    console.log(`Result:`, result);
    return result;
  };

  return descriptor;
}

class MyClass {
  @log
  myMethod(value: number): number {
    return value * 2;
  }
}

const myClass = new MyClass();
myClass.myMethod(5);
In this example, we create a Logger class that has a log method that logs a message to the console. We then define a logMethodCall decorator function that takes in three arguments: target, propertyKey, and descriptor. The decorator function then modifies the descriptor object of the foo the method by replacing its value with a new function that logs information about the method call before calling the original function and returning its result.
Now, when we call example.foo(), the decorator function logMethodCall is executed, and it logs information about the method call before calling the original foo function.
Real-world examples of decorators include things like logging, authentication, and validation. For instance, you could create a @authenticated decorator that checks if a user is logged in before allowing them to access a specific method.
- Mixins
A mixin is a way to combine the functionality of multiple classes into a single one. In other words, mixins allow you to create a new class that has all the features of multiple existing classes.
Here's an example:
class Animal {
  public move(distanceInMeters: number) {
    console.log(`Animal moved ${distanceInMeters}m.`);
  }
}

class CanSwim {
  public swim(distanceInMeters: number) {
    console.log(`Swimming ${distanceInMeters}m.`);
  }
}

class CanFly {
  public fly(distanceInMeters: number) {
    console.log(`Flying ${distanceInMeters}m.`);
  }
}

class Duck implements CanSwim, CanFly {
  swim: (distanceInMeters: number) => void;
  fly: (distanceInMeters: number) => void;

  constructor() {
    this.swim = CanSwim.prototype.swim.bind(this);
    this.fly = CanFly.prototype.fly.bind(this);
  }
}

applyMixins(Duck, [CanSwim, CanFly]);

function applyMixins(derivedCtor: any, baseCtors: any[]) {
  baseCtors.forEach(baseCtor => {
    Object.getOwnPropertyNames(baseCtor.prototype).forEach(name => {
      Object.defineProperty(
        derivedCtor.prototype,
        name,
        Object.getOwnPropertyDescriptor(baseCtor.prototype, name)
      );
    });
  });
}

const duck = new Duck();
duck.swim(10);
duck.fly(20);
In this example, we have three classes: Animal, CanSwim, and CanFly. Animal has a move the method that logs information about an animal's movement. CanSwim has a swim the method that logs information about swimming, and CanFly has a fly the method that logs information about flying.
We then define a new class Duck that implements CanSwim and CanFly. We manually bind the swim and fly methods of CanSwim and CanFly to the Duck class's instance.
We then define a applyMixins function that takes a derived constructor and an array of base constructors. This function iterates over the base constructors and copies their properties and methods to the prototype of the derived constructor. This is how we add the functionality of CanSwim and CanFly to the Duck class.
Finally, we create a new Duck instance and call its swim and fly methods to test the implementation of the CanSwim and CanFly mixins.
Overall, Decorators and Mixins are powerful features of TypeScript that allow you to add additional functionality to your classes, methods, and properties, and create new classes by combining existing ones.
Async and Await
Async and Await in TypeScript allow you to write asynchronous code that looks like synchronous code:
function wait(ms: number) {
  return new Promise(resolve => setTimeout(resolve, ms));
}

async function myAsyncFunction() {  // this function is decleared with async keyword.
  console.log('Start');
  await wait(2000);
  console.log('Middle');
  await wait(2000);
  console.log('End');
}

myAsyncFunction();  //here we are calling a function
In this example, the wait function returns a Promise that resolves after the specified number of milliseconds. The myAsyncFunction function is declared with the async keyword, which means that it returns a Promise. Inside the function, we use the await keyword to wait for the Promises returned by the wait function.
When we call myAsyncFunction, it
logs "
Start," waits for 2 seconds,logs "Middle," waits for another 2 seconds, and
logs "End".
The output of this function looks like synchronous code even though it's asynchronous under the hood.
Using TypeScript with Frameworks and Libraries
TypeScript can be used with a variety of frameworks and libraries. Here are some examples:
Angular
Angular is a popular web framework that is built with TypeScript:
@Component({
  selector: 'app-root',
  templateUrl: './app.component.html',
  styleUrls: ['./app.component.css']
})
export class AppComponent {
  title = 'my-app';
}
React
React is a popular UI library that can be used with TypeScript:
interface Props {
  name: string;
}

function MyComponent(props: Props) {
  return <div>Hello, {props.name}!</div>;
}
Node.js
Node.js is a popular runtime environment that can be used with TypeScript:
import * as http from 'http';

http.createServer((req, res) => {
  res.writeHead(200, { 'Content-Type': 'text/plain' });
  res.end('Hello, TypeScript!');
}).listen(8080);
Best Practices for Writing TypeScript Code
Here are some best practices for writing TypeScript code:
- Consistent code formatting and naming conventions
Use consistent code formatting and naming convention to make your code easier to read and understand. Tools like Prettier and ESLint can help enforce these conventions.
- Proper use of TypeScript types
Use TypeScript types to help catch errors before runtime and provide better editor support for your code. Use interfaces to define the shape of your objects.
- Using third-party libraries with TypeScript
Always use TypeScript definitions for third-party libraries, guaranteeing smooth integration with your TypeScript code. You can install type definitions for popular libraries using npm, or use a tool like DefinitelyTyped to find and install them.
- Type narrowing and guards
Type narrowing and guards are powerful features in TypeScript that allow you to write more precise and safer code.
interface Cat {
  meow(): void;
}

interface Dog {
  bark(): void;
}

function isCat(animal: Cat | Dog): animal is Cat {
  return 'meow' in animal;
}

function makeSound(animal: Cat | Dog) {
  if (isCat(animal)) {
    animal.meow();
  } else {
    animal.bark();
  }
}
In TypeScript, a variable can have multiple possible types, such as the animal parameter in the example code that can be either a Cat or a Dog. When dealing with variables that can have multiple types, writing code that is specific to a particular type can be a challenging task.
This is where type narrowing and guards come into play. Type narrowing allows you to narrow down the type of a variable based on certain conditions so that TypeScript knows more precisely what type the variable is at a given point in your code. This can help catch errors and provide better editor support for your code.
In the example code, the isCat function is a type guard that takes an animal parameter that could be either a Cat or a Dog. It returns a boolean that indicates whether or not the animal parameter is a Cat. By using the animal is Cat syntax in the function signature, we're telling TypeScript that this function is a type guard that narrows down the animal parameter to the Cat type.
The makeSound function takes an animal parameter that could be either a Cat or a Dog. Inside the function, we use the isCat function as a guard to check if the animal parameter is a Cat. If it is, we call the meow method on the animal. Otherwise, we call the bark method on the animal.
Using type guards and narrowing allows us to write more precise and safer code, catching errors at compile time rather than runtime. By telling TypeScript more about the types of our variables, we can leverage the full power of TypeScript's type system to make our code more robust and easier to maintain.
- Using TypeScript with testing frameworks
Testing frameworks like Jest and Cypress can be used with TypeScript to write more robust and type-safe tests:
import { sum } from './my-module';

describe('sum', () => {
  it('should add two numbers together', () => {
    expect(sum(1, 2)).toEqual(3);
  });
});
Conclusion
TypeScript is a powerful tool that can help you write more robust, maintainable, and scalable JavaScript code. It provides several useful features like type checking, interfaces, decorators, and async/awaits that can help catch errors early, improve code readability, and increase productivity. By embracing best practices and using TypeScript with well-known frameworks and libraries, you'll boost your web development skills to impressive levels. So, get started with TypeScript today and take your coding skills to the next level!
If you found this article helpful, don't forget to give it a thumbs up, follow ReactPlay Blogs, and share it with your friends and colleagues. If you have any questions or feedback, feel free to leave a comment below. You can also connect with me on Twitter, LinkedIn, and ShowwCase for more updates and helpful resources on web development. Thank you for reading!