React Play: Building a Progressive Web Application (PWA) using React
How to create a progressive web app using service worker in a React

A self-taught frontend developer, designer, and writer
In recent times, Progressive Web Apps have provided better web experience and rich user interactions thanks to their hybrid approach and progressive enhancement. Additionally, it is fast, safe to use, works without an Internet connection, and resolves some of the problems with websites and mobile apps.
In this tutorial, we will convert a React project to PWA. We will also explore some additional features like web app manifest and service worker.
Prerequisite
Basic understanding of React.
What is a Progressive Web Application?
A progressive web app is a modern web technology that has most of the benefits of native applications. It is a web development approach to creating similar experiences in native apps. It essentially combines the qualities of web and native apps to provide a better user experience and conversion rates.
Features of PWA
Aside from providing better device integration, PWA has the following features:
- Easy to develop and upgrade to new versions.
- Works as a standalone on several mobile devices and desktop computers.
- Can be Installed across all major browsers and platforms.
- Works fast offline and online with smart caching
- Fast load time and performance.
- Access to push notifications.
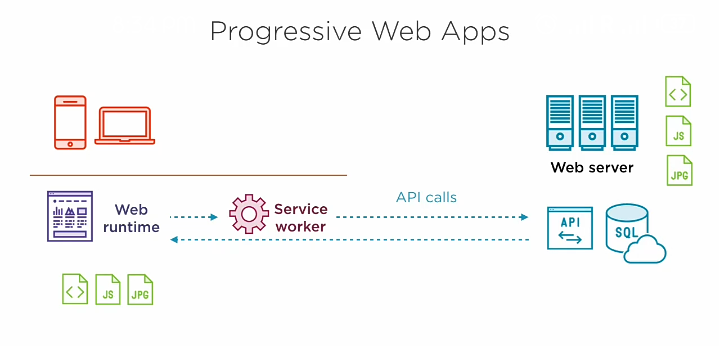
An illustration of how a PWA works
Components of PWAs
PWAs consists of three main components namely:
- Web app manifest
- Service worker
- App distribution module
These are integrated into the Web app, and built using web standards or frameworks like React to render content and test PWAs easier.
Web App Manifest
This is a W3C specification standard containing metadata that provides information about your web application. It is a JSON file that has details added to the server and referenced in the <link> tag.
Service Worker
This works like a proxy between the web app, browser, and the available network. It intercepts all network requests made by the application.
App distribution module
This maintains the interface and handles content with or without a network connection.
Converting a React App into a PWA
To create a progressive web application in a few simple steps, we’ll be using an already existing project - React Play, so we can focus on adding PWA functionalities. The next step is to fork the Github repository and run the following commands:
git clone https://github.com/reactplay/react-play.git

cd reactplay

npm install
#OR
yarn install
Use the following command to start the app in the development mode:
npm start
#OR
yarn start
Now, we should see this project in our browser https://localhost/3000
Steps to build a PWA
1. Update Manifest.json
First, we navigate to public directory and generate a manifest.json file.
Set the icons and other options provided.
Let's first update public/manifest.json with the following code:
{
  "short_name": "ReactPlay",
  "name": "ReactPlay",
  "icons": [
    {
      "src": "favicon.ico",
      "sizes": "64x64 32x32 24x24 16x16",
      "type": "image/x-icon"
    },
    {
      "src": "logo192x192.png",
      "type": "image/png",
      "sizes": "192x192"
    },
    {
      "src": "logo512x512.png",
      "type": "image/png",
      "sizes": "512x512"
    },
    {
      "src": "maskable_icon.png",
      "sizes": "64x64 32x32 24x24 16x16 512x512 192x192",
      "type": "image/png",
      "purpose": "maskable"
    }
  ],
  "start_url": ".",
  "display": "standalone",
  "theme_color": "#000000",
  "background_color": "#ffffff"
}
So, What do these fields represent:
name: Name of the web app.short name: An exact easy-to-remember name, it could be an acronym.icons: Set of custom icons for the web app.start_url: Instructs the browser to load thehomepage when the PWA is launched.display: Appearance similar to native apps.theme_color: Color of the toolbar.background_color: Color ofsplash screenwhen the PWA is launched.
You are required to create a custom icon for your project of sizes 16, 32, 48, 152, and 192 pixels of equal dimensions.
To ensure the PWA is well optimized, ensure the following meta tags are within the <head> in the index.html file:
   <link rel="icon" href="./favicon.ico" />
   <link rel="apple-touch-icon" href="./logo.png" />
   <link rel="manifest" href="./manifest.json" />
2. Create service worker
In the src directory of our React app, create a service-worker.js and add the following logic:
import { createHandlerBoundToURL, precacheAndRoute } from "workbox-precaching";
import { clientsClaim } from "workbox-core";
import { registerRoute } from "workbox-routing";
import { CacheFirst, StaleWhileRevalidate } from "workbox-strategies";
import { ExpirationPlugin } from "workbox-expiration";
import { CacheableResponsePlugin } from "workbox-cacheable-response";

clientsClaim();

precacheAndRoute(self.__WB_MANIFEST);

const fileExtensionRegexp = new RegExp("/[^/?]+\\.[^/]+$");
registerRoute(({ request, url }) => {
  if (request.mode !== "navigate") {
    return false;
  }
  if (url.pathname.startsWith("/_")) {
    return false;
  }
  if (url.pathname.match(fileExtensionRegexp)) {
    return false;
  }
  return true;
}, createHandlerBoundToURL(process.env.PUBLIC_URL + "/index.html"));

registerRoute(
  ({ url }) => {
    const formatImages = [".jpeg", ".jpg", ".png", ".svg", ".gif"];
    const ifImage = formatImages.some((i) => url.pathname.endsWith(i));
    return url.origin === self.location.origin && ifImage;
  },
  new StaleWhileRevalidate({
    cacheName: "images-cache",
    plugins: [new ExpirationPlugin({ maxEntries: 50 })],
  })
);

registerRoute(
  ({ url }) => {
    return url.origin === self.location.origin;
  },
  new CacheFirst({
    cacheName: "api-cache",
    plugins: [
      new CacheableResponsePlugin({
        statuses: [200],
      }),
    ],
  })
);

self.addEventListener("message", (event) => {
  if (event.data && event.data.type === "SKIP_WAITING") {
    self.skipWaiting();
  }
});
3. Register Service Worker
Next, create a registerServiceWorker.js in the same src directory.
import { Workbox } from "workbox-window";

const register = () => {
  if (process.env.NODE_ENV !== "production") return;
  if (navigator?.serviceWorker) {
    const wb = new Workbox(`${process.env.PUBLIC_URL}/service-worker.js`);

    const checkForUpdate = () => {
      const isUpdate = window.confirm("New Update Available. Click OK to update");
      if (isUpdate) {
        wb.messageSkipWaiting();
      }
    };

    wb.addEventListener("waiting", checkForUpdate);
    wb.register();
  }
};

export default register;
The next step is to register the web app service worker. So, import registerServiceWorker.js in index.js.
import register from "./registerServiceWorker";
Immediately after const container = document.getElementById("root");
createRoot(container).render(<Index />);, Call the register function:
register();
This implementation makes the app work offline and load faster.
Here’s how it should look:
import RouteDefs from "common/routing/RouteDefs";
import { SearchContext } from "common/search/search-context";
import "index.css";
import React, { useState } from "react";
import { createRoot } from "react-dom/client";
import reportWebVitals from "reportWebVitals";
import register from "./registerServiceWorker";
if (process.env.NODE_ENV !== "development") {
console.log = () => {};
console.debug = () => {};
console.info = () => {};
console.disableYellowBox = true;
}
const Index = () => {
const [searchTerm, setSearchTerm] = useState("");
const [showShareModal, setShowShareModal] = useState(false);
const [filterQuery, setFilterQuery] = useState({
level_id: "",
tags: [],
owner_user_id: "",
language: "",
});
const value = {
searchTerm,
setSearchTerm,
filterQuery,
setFilterQuery,
showShareModal,
setShowShareModal,
};
return (
<React.StrictMode>
<SearchContext.Provider value={value}>
<RouteDefs />
</SearchContext.Provider>
</React.StrictMode>
);
};
const container = document.getElementById("root");
createRoot(container).render(<Index />);
register();
Now, this icon should appear on your desktop browser tab for direct installation.

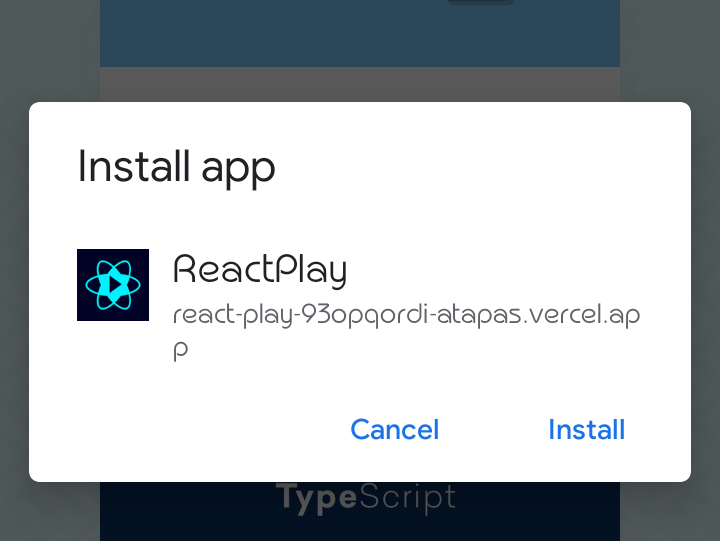
On a mobile device, the installation prompt looks a bit different.

On click, shows a popup to Install.
Testing PWAs
Web apps are required to pass certain criteria to be recognized as PWA. These criteria are measured using PWA tools like Lighthouse - An open-source Chrome tool for testing websites against PWA criteria.
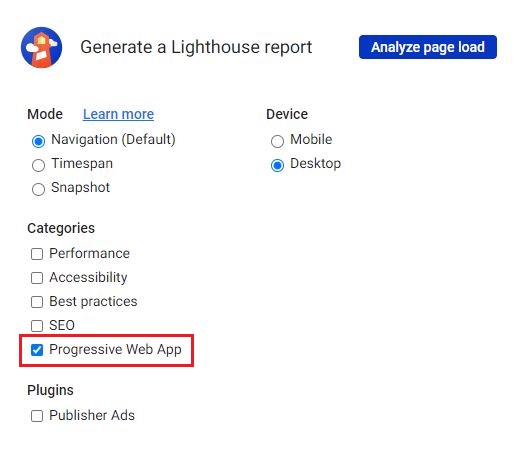
Navigate to the Developer tools panel, select the Lighthouse, check Progressive Web App, and then Analyze page load. At the end of the analysis, it will display passed criteria and failed ones if any.
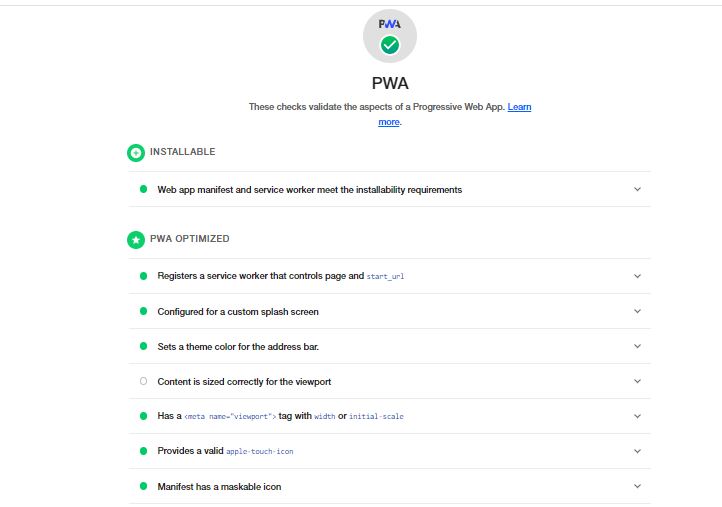
PWA score of 100%
Passed criteria are given a
green check markwhile failed ones are indicated withred check markwith details of the issue.
Conclusion
Although PWA offers some of the qualities and features of native apps, they have some limitations and won't completely replace native apps.
As we have seen, converting a React app to a progressive web app comes with some advantages. I hope you have found this helpful and would consider integrating this feature into your next project.
Thanks for reading! If you have any follow-up questions or would like to connect with me, feel free to do so on Twitter.